Learn how to track your loan with the help of Setup Loan Manager in QuickBooks Desktop.
QuickBooks Loan Manager helps you calculate interest and payment schedules. We’ll help you get started so you can track your new and existing loans, make repayments, and run different “what-if” scenarios to compare different loan options.
Note: If you’re using QuickBooks Online, here’s how to set up and track your loan.
Step 1: Set up the accounts for QuickBooks Loan Manager
Set up a liability, vendor, and expense account
Before you can track loans with QuickBooks Loan Manager, you first need to set up a liability, vendor, and expense account.
Set up an escrow account
An escrow is a portion of a loan that’s managed by a third-party until you fulfill the loan conditions. In QuickBooks, an escrow account is an asset account that tracks the escrow portion of a loan payment.
Here’s how to set up an escrow account if you need one for your loan.
- Go to the Lists menu, then select Chart of Accounts.
- Select the Account dropdown, then New.
- Select Other Account Types, then Other Current Asset.
- Click Continue.
- Enter the account name.
- Select Save Close.
Step 2: Record and track your loans
If everything is all set, you can now track your loan in QuickBooks Loan Manager.
- Go to the Banking menu, then select Loan Manager.
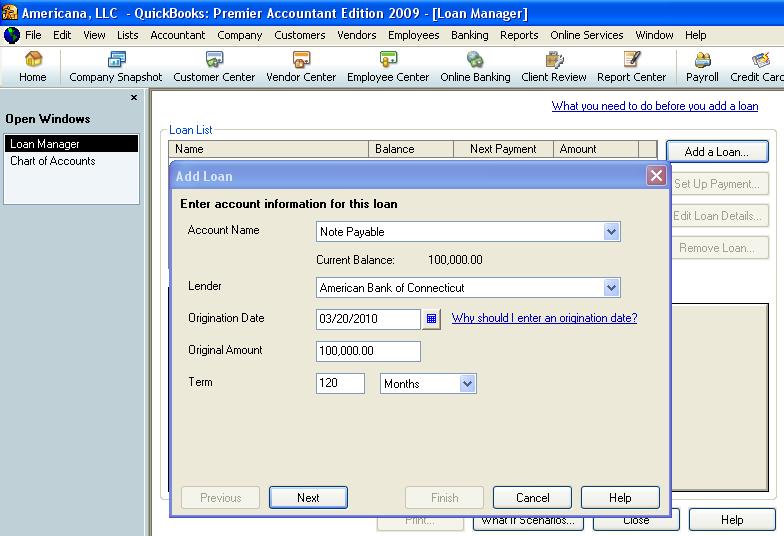
- Select Add a Loan.
- Enter the account info for the loan.
- Account Name: Select the loan account you previously made.
- Lender: Select the vendor you will pay for the loan.
- Origination Date: Enter the date when the loan is funded.
- Original Amount: Enter the full, initial loan amount.
- Term: Select the time it will take to repay the loan.
- When you’re ready, select Next.
- Enter the payment info for the loan.
- Due Date of Next Payment: Enter the due date for your next payment
- Payment Amount: Enter the amount you need to pay for each period.
- Next Payment Number: If you already made payments before, enter the payment number for the following payment.
- If the loan has an escrow payment account, select Yes. Then fill out the necessary fields.
- (Optional) If you want a reminder for upcoming payments, select Alert me 10 days before a payment is due.
Note: If you already made payments for the loan, you need to enter these as checks, bills, or journal entries.
- Select Next.
- Enter the interest info for the loan.
- Interest Rate: Enter the interest rate of the loan. For example, enter a 5% interest rate as 5.
- Compounding Period: Select what’s specified on your loan documents.
- Payment Account: Select the bank account you want to use to pay the loan.
- Interest Expense Account: Select the expense account that will track the interest.
- Fees/Charges Expense Account: Select the expense account that will track the fees and charges of your loan.
- When you’re done, select Finish.
Note: You can see your loan details in the Summary tab of Loan Manager.
Step 3: Asses your loan with What If Scenarios tool
To compare different loan options and to see what else you can do with your loan in different scenarios, use the What If Scenarios tool.
- Go to the Banking menu, then select Loan Manager.
- Select What If Scenarios.
- In the Choose a scenario dropdown, select a loan scenario.
- In the Choose a loan dropdown, select the loan account you want to evaluate.
- Fill out the fields as needed, then select Calculate.
- (Optional) Select Print to print the results.