Reconcile an account in QuickBooks Desktop
Learn how to reconcile your accounts so they match your bank and credit card statements and learn How to Reconcile an account in QuickBooks Desktop in 2020
Just like balancing your checkbook, you need to review your accounts in QuickBooks to make sure they match your real-life bank and credit card statements. This process is called reconciling.
We recommend you reconciling your checking, savings, and credit card accounts every month. Once you get your bank statements, compare the list of transactions with what you entered into QuickBooks. If everything matches, you know your accounts are balanced and accurate.
Step 1: Review your opening balance
If you haven’t already, back up your company file.
If you’re reconciling an account for the first time, review the opening balance. The opening balance needs to match the balance of your real-life bank account for whatever day you choose to start tracking the account in QuickBooks.
Learn more about opening balances
Step 2: Prepare for the reconciliation
Make sure you enter all transactions for the bank statement period you plan to reconcile. If there are transactions that haven’t cleared your bank yet and aren’t on your statement, wait to enter them.
https://www.youtube.com/watch?v=IyzE-JBs7KQ&t=3s
Step 3: Start your reconciliation
Once you get your bank statement, you can start reconciling.
If you’re reconciling multiple months, start with your oldest bank statement. Reconcile each month separately, one statement at a time.
- Go to the Banking menu and select Reconcile.
Important: If you’re reconciling a Merchant or Payments account and QuickBooks Desktop sees that you aren’t signed in, you’ll see a sign-in window. This ensures your account is successfully linked to a valid company ID. - In the Account field, select the bank or credit card account you want to reconcile.
- The Statement Date is automatically filled in. Usually, it’s 30 or 31 days after the statement date of the previous reconciliation. Change it as needed to match your bank statement.
- QuickBooks also automatically enters the Beginning Balance. It uses the ending balance from your last reconciliation to get this number. Make sure it matches the beginning balance on your bank statement. If it doesn’t, here’s how to fix your beginning balance.
- In the Ending Balance field, enter the ending balance as it appears on your bank statement.
- If your bank statement shows a service charge or interest that you didn’t enter into QuickBooks, don’t worry. Enter the amounts in the Service Charge and Interest Earned section. Don’t enter charges you’ve already entered in QuickBooks.
- Review the fields. If the info is correct, select Continue to start reconciling.
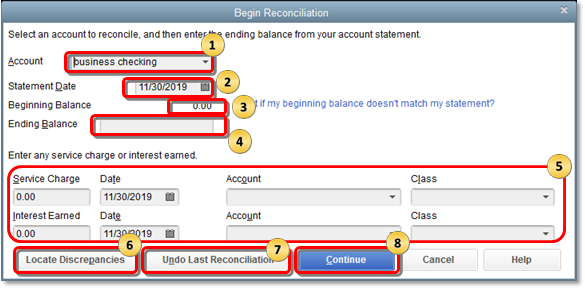
If your beginning balance doesn’t match your statement, don’t worry. You have a few tools that can help you.
- If numbers don’t match, select Locate Discrepancies. This gives you reports you can use to find discrepancies and other reconciliation issues.
- If you still have issues, here’s how to fix your opening balance and beginning balance.
- Or If you need to start over from scratch, you can select Undo Last Reconciliation.
Note: When you undo a previous reconciliation, your beginning balance reverts back to the beginning balance of the reconciliation before it. All cleared transactions on the reconciliation become uncleared. |
Step 4: Compare your bank statement and QuickBooks
To reconcile, simply compare the list of transactions on your bank statement with what’s in QuickBooks.
The tricky part is making sure you have the right dates and transactions. When you’re done reviewing your statement, you’ll know everything made it into QuickBooks.
Here are a few things to make reconciling easier.
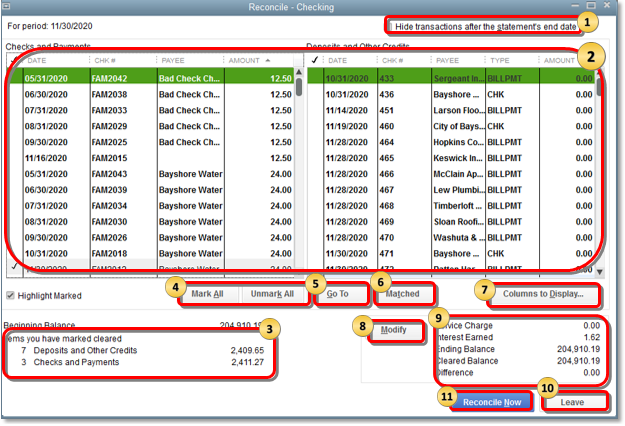
- Firstly, If you only want to see transactions for the statement period you’re working on, select Hide transactions after the statement’s end date.
- Secondly, There are two sections for bank account transactions in QuickBooks: Checks and Payments (money out) and Deposits and other Credits (money in). If you’re reconciling a credit card account, the sections are Charges and Cash Advances (purchases) and Payments and Credits (payments to the credit card company). Focus on one section at a time.
- If you’re reconciling an account set up for online banking, select Matched. Then, enter your bank statement’s ending date in the Statement Ending Date window. This automatically selects transactions QuickBooks downloaded and matched. Note: A matched transaction in the register has a lightning bolt next to it. A checkmark replaces the lightning bolt after you reconcile it.
- Lastly, If you want to sort the list, select the header/title of a column.
Tip: By default, the transactions are listed by to date. If there are more transactions in QuickBooks than there are on your bank statement, resort the list. This makes it easier to find transactions with a specific amount, reference #, etc. |
-
When you’re ready, start with the first transaction on your bank statement.
- Find the same one in the Reconciliation window in QuickBooks.
- Compare the two transactions. If the transactions match, select and put a checkmark in the checkmark column. This reconciles the transaction.
- Compare each transaction on your statement with what’s in QuickBooks. As you clear or add transactions to the reconciliation, the Cleared Balance amount decreases. The amount increases if you clear or add deposits and other credit amounts.
Tip: If a transaction doesn’t appear on your statement, don’t mark it as reconciled. Here are some quick ways to check if things are matching: - The Items you’ve marked cleared section shows the total number and total amount of transactions you’ve added to the reconciliation. Many banks provide the same summary of transactions on bank statements. Compare the total number of transactions to see if anything is missing.
- Need to edit or get more info about a specific transaction? Select the transaction and then Go To.
- If you need to take a step back and make a change to the info you entered in “Step 3: Start your Reconciliation,” select Modify. The service charges, interest, and ending balance info are shown in the section next to it.
- When you reach the end, the difference between your bank statement and QuickBooks should be $0.00. If it is, select Reconcile now to complete the reconciliation.
If balances don’t match at the end
The difference isn’t $0.00, don’t worry. QuickBooks gives you several ways to fix any issues.
For bank accounts, QuickBooks opens the Reconcile Adjustment window. You have a few options:
- Return to Reconcile: Go back to the reconciliation so you can review everything again.
- Leave Reconcile: Save the reconciliation so you can review or edit any existing transactions causing issues. You can come back and finish the reconciliation later.
- Enter Adjustment: If you want to complete the reconciliation, you can force QuickBooks to create an adjustment to balance everything. You should only do this if you know all of the correct transactions are in QuickBooks and what you entered is accurate. QuickBooks automatically enters the adjustment as journal entry.
The journal entry goes into a special expense account called Reconciliation Discrepancies. If you need to review the adjustment later on:
- Firstly Go to the Edit menu and select Find.
- In the Find window, go to the Advanced tab and select the Memo filter.
- In the Memo field, type Balance Adjustment and select Find.
You’ll see all of your adjustments on the list. Then review a Previous Reconciliation report for the reconciliation you adjusted. This will show you cleared transactions and any changes made after the transaction that may not show in your discrepancies.
- Firstly, Go to the Reports menu and select Reports Center.
- Search for and open a Previous Reconciliation report.
- Select the account you reconciled and then either Detail, Summary, or Both.
- Select Transactions cleared plus any changes made to those transactions since the reconciliation.
- Click Display.
However, If you made an adjustment, you’ll see a General Journal Entry at the top of the report in the Cleared Transactions section.
For other types of accounts, QuickBooks opens the Make Payment window. This lets you write a check or enter a bill to pay to cover the outstanding balance. If you don’t want to record payment, select Cancel.
If you run into issues or discrepancies, meaning transactions in QuickBooks don’t match your bank statement, don’t worry. Here’s how to fix mismatches and other reconciliation issues:
Next Steps: Review the reconciliation
After you reconcile, you can select Display to view the Reconciliation report or Print to print it. Your work is done.
If you need to review a reconciliation report later on:
- Firstly, Go to the Reports menu and select Reports Center.
- Search for and open a Previous Reconciliation report.
- Select the account you reconciled and then either Detail, Summary, or Both.